Create an Eclipse Lyo project
This document provides step-by-step instructions for creating a Java project with the necessary configurations to develop OSLC server/client applications using Lyo. The instructions assume Eclipse IDE is being used, but are equally valid for other development environments.
An alternative to the manual steps below
An alternative to the instructions on this page is to use Lyo Designer to quickly generate the project, including a very basic code skeleton. The generated project will also include the necessary setup for OpenApi/Swagger support, TRS, etc.
- Set up the environment for Lyo development as instructed on Eclipse Setup for Lyo-based Development.
- Install Lyo Designer.
- Follow the Create a Modelling Project instructions (Only this particular section) to create the Eclipse project.
- Follow the Adaptor Interface instructions (Only this particular section) to create a single Adaptor Interface in the model. Do not create additional elements, such as a Service Provider Catalog, Service Provider, etc. Set the generation settings as expected.
- Follow the Generate Lyo Java code instructions (Only this particular section) to generate the basic project setup.
- The process is complete! Lyo Designer can be used to model the complete OSLC Server/Client and generate additional project code.
Introduction
In the instructions below, the following parameters are assumed, which need to be adjusted for the particular project:
- Eclipse Project Name:
adaptor-sample-webapp - Base Package Name for Java Classes:
com.sample.adaptor
These instructions create only the code skeleton. The Toolchain Modelling Workshop can then be used to generate the necessary code to become a fully functional server.
As a complement when following the instructions below, you can find sample projects under the Lyo Adaptor Sample Modelling git repository.
- For Lyo 4.1.0, please refer to the
main-4.xbranch. - For Lyo 5.0.0-SNAPSHOT, please refer to the
main-5.xbranch. - For Lyo 2.4.0, please refer to the
main-2.xbranch.
Creating the project consists of these steps:
- Set up Eclipse
- Decide if you want to adopt JAX-RS 1.0 or 2.0?
- Create a Maven project
- Customise the project POM file
- Customise the web configuration
- (Optional) Provide OpenApi/Swagger Support
- (Optional) Provide TRS Support
- Run the server
Set up Eclipse
Set up the environment for Lyo development as instructed on Eclipse Setup for Lyo-based Development.
Create a Maven project
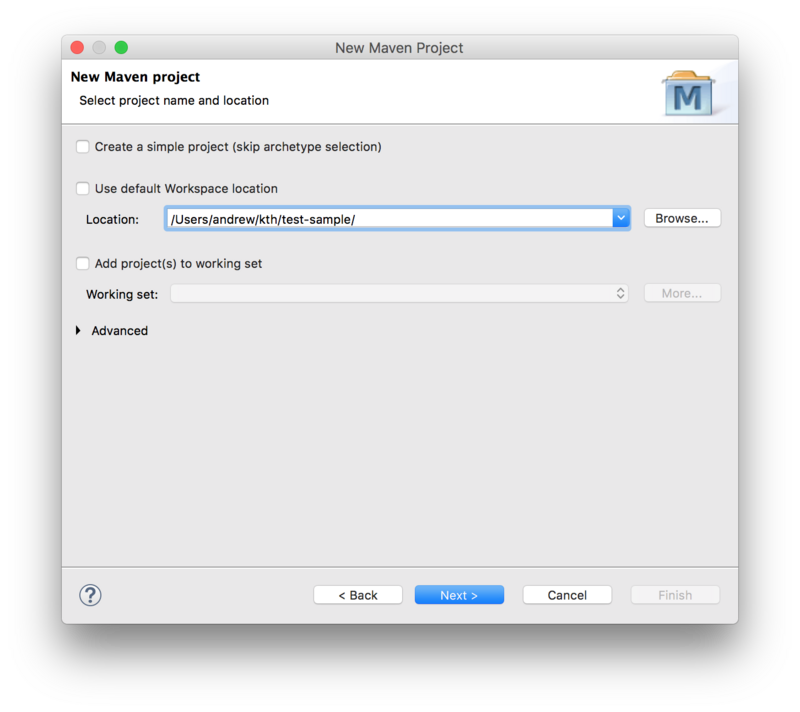
To create a Maven project from an archetype via Eclipse:
- Select File -> New -> Other.
- Then select Maven Project under Maven group.
- Leave the Create a simple project checkbox unchecked.
- Uncheck the Use default Workspace location option and point it to the project root.
- Press Next.
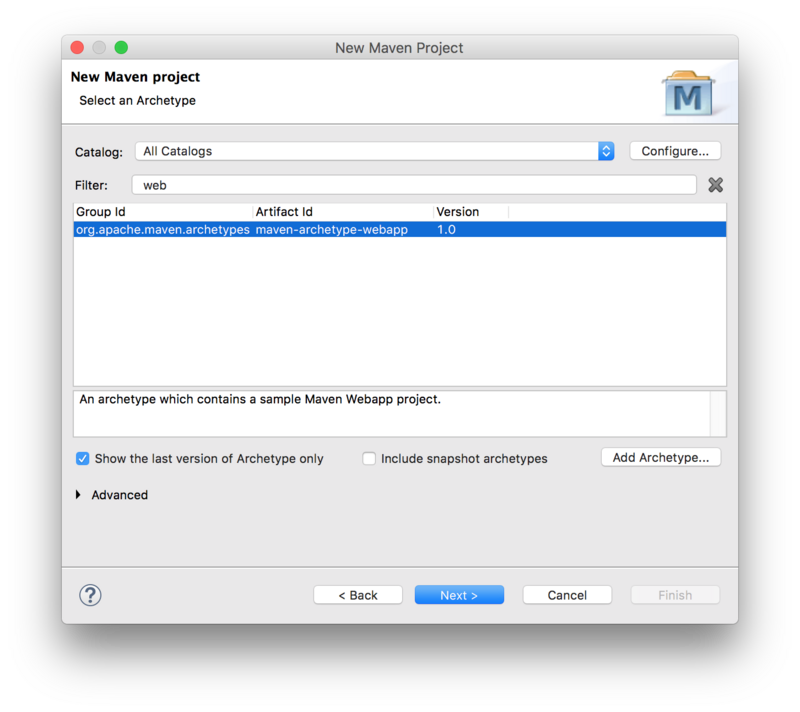
Next, select the maven-archetype-webapp archetype:
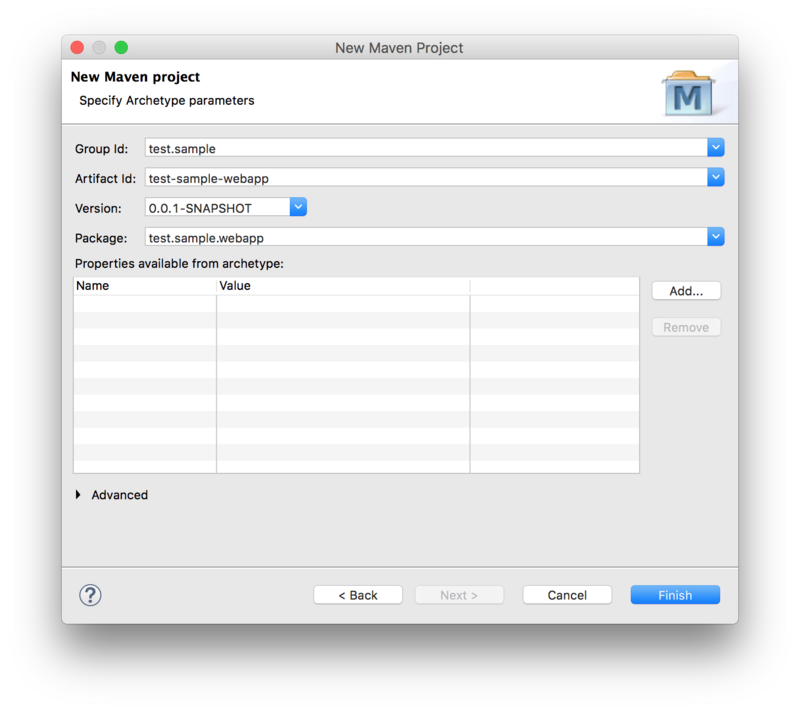
Next, fill in the Group Id, Artifact Id, and the Package Base.
- The Package Base value (
com.sample.adaptoron this page) will be used as a base package for the server code.
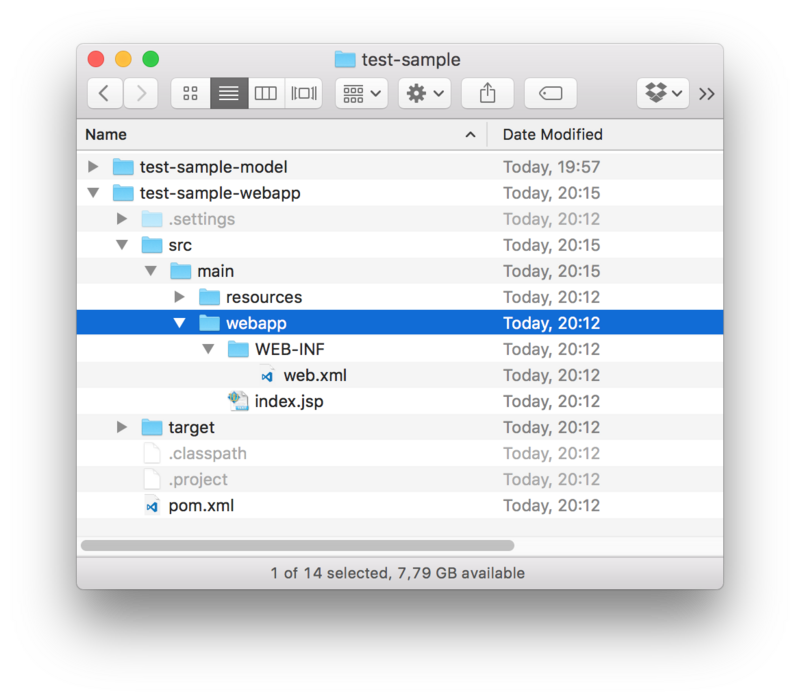
The project is now available in Eclipse with the following folder structure:
Customise the project POM file
Modify the project pom.xml file.
Set up general POM properties
Use properties to define a common version for Lyo packages:
<properties>
  <project.build.sourceEncoding>UTF-8</project.build.sourceEncoding>
  <project.reporting.outputEncoding>UTF-8</project.reporting.outputEncoding>
  <maven.compiler.source>17</maven.compiler.source>
  <maven.compiler.target>17</maven.compiler.target>
  <version.lyo>6.0.0.Final</version.lyo>
</properties>
(Optional) Add Lyo repositories
Lyo release artefacts are on Maven central since 4.0.0 - no action needed.
If using the latest development snapshots is required, the following entry is needed:
<repositories>
    <repository>
        <name>Central Portal Snapshots</name>
        <id>central-portal-snapshots</id>
        <url>https://central.sonatype.com/repository/maven-snapshots/</url>
        <releases>
            <enabled>false</enabled>
        </releases>
        <snapshots>
            <enabled>true</enabled>
        </snapshots>
    </repository>
</repositories>
SLF4J package dependencies
Lyo uses SLF4J for logging, leaving the choice of the actual logging library to use. The simplest option:
<dependency>
  <groupId>org.slf4j</groupId>
  <artifactId>slf4j-simple</artifactId>
  <version>1.7.36</version>
  <scope>runtime</scope>
</dependency>
Servlet dependencies
Java EE 6 or higher and JSTL are required:
<dependency>
  <groupId>javax.servlet</groupId>
  <artifactId>javax.servlet-api</artifactId>
  <version>3.1.0</version>
  <scope>provided</scope>
</dependency>
<dependency>
  <groupId>javax.servlet</groupId>
  <artifactId>jstl</artifactId>
  <version>1.2</version>
</dependency>
JAX-RS implementation dependencies
Lyo depends on JAX-RS APIs and your application needs to add implementations of those APIs.
For Lyo 5.x
For Lyo release 5.0.0 and above, choose a JAX-RS 2.0 implementation. If using Jersey, use version 2.35.
Note
Starting with Jersey 2.26, HK2 is not bundled with the core artefacts (see the Jersey migration guide).
<dependency>
  <groupId>org.glassfish.jersey.core</groupId>
  <artifactId>jersey-server</artifactId>
  <version>2.35</version>
</dependency>
<dependency>
  <groupId>org.glassfish.jersey.containers</groupId>
  <artifactId>jersey-container-servlet</artifactId>
  <version>2.35</version>
</dependency>
<dependency>
    <groupId>org.glassfish.jersey.inject</groupId>
    <artifactId>jersey-hk2</artifactId>
    <version>2.35</version>
</dependency>
Lyo dependencies
The minimal Lyo dependencies are:
<dependency>
  <groupId>org.eclipse.lyo.oslc4j.core</groupId>
  <artifactId>oslc4j-core</artifactId>
  <version>${version.lyo}</version>
</dependency>
<dependency>
  <groupId>org.eclipse.lyo.oslc4j.core</groupId>
  <artifactId>oslc4j-jena-provider</artifactId>
  <version>${version.lyo}</version>
</dependency>
<dependency>
  <groupId>org.eclipse.lyo.oslc4j.core</groupId>
  <artifactId>oslc4j-json4j-provider</artifactId>
  <version>${version.lyo}</version>
</dependency>
OSLC OAuth support
If your server needs to support OAuth, include the following:
<dependency>
  <groupId>org.eclipse.lyo.server</groupId>
  <artifactId>oauth-core</artifactId>
  <version>${version.lyo}</version>
</dependency>
<dependency>
  <groupId>org.eclipse.lyo.server</groupId>
  <artifactId>oauth-consumer-store</artifactId>
  <version>${version.lyo}</version>
</dependency>
<dependency>
  <groupId>org.eclipse.lyo.server</groupId>
  <artifactId>oauth-webapp</artifactId>
  <version>${version.lyo}</version>
  <type>war</type>
</dependency>
To support OAuth, add the following JAX-RS Providers to the Application (the javax.ws.rs.core.Application subclass):
RESOURCE_CLASSES.add(Class.forName("org.eclipse.lyo.server.oauth.webapp.services.ConsumersService"));
RESOURCE_CLASSES.add(Class.forName("org.eclipse.lyo.server.oauth.webapp.services.OAuthService"));
OSLC Client support
If your OSLC server also needs to consume resources from another server, a dependency to the OSLC client package is needed:
For Lyo 4.0+
<dependency>
  <groupId>org.eclipse.lyo.clients</groupId>
  <artifactId>oslc-client</artifactId>
  <version>${version.lyo}</version>
</dependency>
Configure the Embedded Jetty server for quick debugging
Finally, use an embedded servlet container during the debugging to simplify the development process.
Replace the existing <build> entry with the Jetty configuration below, using the following customisations:
adaptor-sampleis the context path that can be the same as the eclipse project name (or something more appropriate)8080is the port number to run the services on.
This will make the server available under the path http://localhost:8080/adaptor-sample.
<build>
  <plugins>
    <plugin>
      <groupId>org.eclipse.jetty</groupId>
      <artifactId>jetty-maven-plugin</artifactId>
      <version>9.4.46.v20220331</version>
      <configuration>
        <webAppConfig>
          <contextPath>/adaptor-sample</contextPath>
        </webAppConfig>
        <reload>automatic</reload>
        <scanIntervalSeconds>5</scanIntervalSeconds>
        <systemProperties>
          <systemProperty>
            <name>jetty.port</name>
            <value>8080</value>
          </systemProperty>
        </systemProperties>
        <stopKey />
        <stopPort />
      </configuration>
    </plugin>
  </plugins>
</build>
Customise the web configuration
Modify the parameters in /src/main/webapp/WEB-INF/web.xml according to the template below.
Adaptor Samplecould be the same as the eclipse project name (or something more appropriate).com.sample.adaptorshould be the same as the base package name for the project.8080should match the port number specified in the POM file for Jetty configuration.
<?xml version="1.0" encoding="UTF-8"?>
<web-app xmlns:xsi="http://www.w3.org/2001/XMLSchema-instance"
  xmlns="http://java.sun.com/xml/ns/javaee"
  xsi:schemaLocation="http://java.sun.com/xml/ns/javaee http://java.sun.com/xml/ns/javaee/web-app_3_0.xsd"
  id="WebApp_ID" version="3.0">
  <display-name>Adaptor Sample</display-name>
  <context-param>
    <description>Base URI for the adaptor.</description>
    <param-name>com.sample.adaptor.servlet.baseurl</param-name>
    <param-value>http://localhost:8080</param-value>
  </context-param>
  <listener>
    <description>Listener for ServletContext lifecycle changes</description>
    <listener-class>com.sample.adaptor.servlet.ServletListener</listener-class>
  </listener>
  <servlet>
    <servlet-name>JAX-RS Servlet</servlet-name>
    <servlet-class>org.glassfish.jersey.servlet.ServletContainer</servlet-class>
    <init-param>
      <param-name>javax.ws.rs.Application</param-name>
      <param-value>com.sample.adaptor.servlet.Application</param-value>
    </init-param>
    <load-on-startup>1</load-on-startup>
  </servlet>
  <servlet-mapping>
    <servlet-name>JAX-RS Servlet</servlet-name>
    <url-pattern>/services/*</url-pattern>
  </servlet-mapping>
</web-app>
(Optional) Provide OpenApi/Swagger Support
With OSLC being based on REST, an OSLC Server can relatively easily be documented using OpenApi/Swagger.
The instructions below are based on Swagger Core JAX RS Project Setup 1.5.X, compiled for a typical Lyo project. The instructions are also partially based on Co-hosting Swagger UI with your Jersey REST API using Maven dependencies. The instructions provide the minimal settings necessary for a Lyo project.
Add OpenApi/Swagger Maven dependencies
Add the following Swagger dependency to the maven pom.xml file.
For Lyo 5.0.0
Assuming the Jersey implementation is adopted with the version specified above.
<dependency>
  <groupId>io.swagger.core.v3</groupId>
  <artifactId>swagger-jaxrs2</artifactId>
  <version>2.1.4</version>
  <exclusions>
    <exclusion>
      <!--should be <provided>-->
      <groupId>jakarta.activation</groupId>
      <artifactId>jakarta.activation-api</artifactId>
    </exclusion>
  </exclusions>
</dependency>
<dependency>
  <groupId>io.swagger.core.v3</groupId>
  <artifactId>swagger-jaxrs2-servlet-initializer-v2</artifactId>
  <version>2.1.4</version>
</dependency>
Co-host Swagger UI with the server
The following steps provide the end-user with an interactive console to the OSLC services, by integrating Swagger UI with the OSLC server.
Add the following plugins to the existing <plugins> entry of the pom.xml file. These plugins download and extract the necessary Swagger UI files from Swagger UI GitHub project onto the project:
<build>
  <plugins>
    <plugin>
    ...
    </plugin>
    <plugin>
      <!-- Download Swagger UI webjar. -->
      <groupId>org.apache.maven.plugins</groupId>
      <artifactId>maven-dependency-plugin</artifactId>
      <version>3.1.2</version>
      <executions>
          <execution>
              <phase>prepare-package</phase>
              <goals>
                  <goal>unpack</goal>
              </goals>
              <configuration>
                  <artifactItems>
                      <artifactItem>
                          <groupId>org.webjars</groupId>
                          <artifactId>swagger-ui</artifactId>
                          <version>3.25.0</version>
                      </artifactItem>
                  </artifactItems>
                  <outputDirectory>${project.build.directory}/swagger-ui</outputDirectory>
              </configuration>
          </execution>
      </executions>
    </plugin>
    <plugin>
      <!-- Add Swagger UI resources to the war file. -->
      <groupId>org.apache.maven.plugins</groupId>
      <artifactId>maven-war-plugin</artifactId>
      <version>3.2.3</version>
      <configuration>
          <webResources combine.children="append">
              <resource>
                  <directory>${project.build.directory}/swagger-ui/META-INF/resources/webjars/swagger-ui/3.25.0</directory>
                  <includes>
                      <include>**/*.*</include>
                  </includes>
                  <targetPath>/swagger-ui/dist</targetPath>
              </resource>
          </webResources>
      </configuration>
    </plugin>
  </plugins>
</build>
Add Swagger-Core's JAX-RS Providers to your Application
Add swagger-core's JAX-RS Providers to the Application class that extends javax.ws.rs.core.Application:
public class Application extends javax.ws.rs.core.Application {
  private static final Set<Class<?>> RESOURCE_CLASSES = new HashSet<Class<?>>();
    static
    {
      ...
      RESOURCE_CLASSES.add(io.swagger.jaxrs.listing.ApiListingResource.class);
      RESOURCE_CLASSES.add(io.swagger.jaxrs.listing.SwaggerSerializers.class);
      ...
    }
    ...
Configure Swagger's Servlet in the web.xml
Add the following to the web.xml:
swagger.api.basepathdepends on the particular settings, as instructed above.
  <servlet>
    <servlet-name>DefaultJaxrsConfig</servlet-name>
    <servlet-class>io.swagger.jaxrs.config.DefaultJaxrsConfig</servlet-class>
    <init-param>
      <param-name>api.version</param-name>
      <param-value>1.0.0</param-value>
    </init-param>
    <init-param>
      <param-name>swagger.api.basepath</param-name>
      <param-value>http://localhost:8080/adaptor-sample/services/</param-value>
    </init-param>
    <load-on-startup>2</load-on-startup>
  </servlet>
Add OpenApi Annotations (Almost Optional)
The OpenApi documentation can be achieved with as little as adding @Api to each REST/OSLC service in your project. This is detailed in the first step below. While the remaining instructions are optional, they are highly recommended to provide a documentation that can best reflect the OSLC services.
@Api
- For each REST service (i.e. OSLC Service), simply add the
@Apiannotation. - (OPTIONAL) add the
valueanddescriptiondetails. Thevalueis used to group the REST methods into common categories, helping in the structuring of the methods in the documentation. You can give it the same value as that of the @Path annotation, collecting all REST methods for the same service together.
@Api(value = "requirements", description = "OSLC service for resources of type" + "Requirement")
@OslcService(Oslc_rmDomainConstants.REQUIREMENTS_MANAGEMENT_DOMAIN)
@Path("requirements")
@ApiOperation (Optional)
For each REST method, add the @ApiOperation Swagger annotation.
OpenApi Operation Uniqueness
In OpenApi, an operation is considered unique based on the combination of its path and HTTP method. This means you cannot define multiple C.R.U.D. methods for the same path and method—even if they differ by parameters such as Accept or Content-Type.
Example
If your OSLC Service defines separate Java methods to handle HTML and RDF/XML content types for the same path and HTTP method, OpenApi will only recognise one of these methods and ignore the other.
Workaround: Annotate ALL methods that are identified as unique with the complete list of media types in the produces property of the @ApiOperation annotation. This way, the generated documentation correctly indicates the existence of all methods.
@ApiModel (Optional)
For each Java class that models an OSLC-resource (@OslcName annotation), add an @ApiModel annotation that refers to the Shape of the resource, since a Shape is a more accurate description of the object, than the one automatically generated by Swagger.
@ApiModel(description = "The model below is only an object structure as derived by swagger. For a more accurate RDF Description, refer to the Requirement Resource Shape.")
@OslcNamespace(Oslc_rmDomainConstants.REQUIREMENT_NAMESPACE)
@OslcName(Oslc_rmDomainConstants.REQUIREMENT_LOCALNAME)
@OslcResourceShape(title = "Requirement Resource Shape", describes = Oslc_rmDomainConstants.REQUIREMENT_TYPE)
public class Requirement
...
Access the Swagger UI interactive console
Before accessing the Swagger UI interactive console for the first time, edit the swagger-ui/index.html file, replacing the url http://petstore.swagger.io/v2/swagger.json with the URL of the YAML file http://localhost:8080/adaptor-sample/services/swagger.yaml.
The generated interactive API console can be accessed via:
http://localhost:8080/adaptor-sample/swagger-ui/
Access OpenAPI specification document (yaml file)
You can also access the OpenAPI specification document (yaml file) at:
http://localhost:8080/adaptor-sample/services/swagger.yaml
You can copy the yaml file to a Swagger Editor, to view the API documentation, as well as generate client/Server SDK code for a number of languages and platforms.
(Optional) Provide TRS Support
The TRS Server library is a set of ready-to-use classes that provide the required REST services for TRS, with minimal effort. The current implementation supports an In-memory TRS Server that does not persist its TRS resources. These classes are however designed to be extended for a persistent solution. For a thorough walkthrough of TRS solutions, which among other things ensures persisting the TRS Logs, visit the additional information on TRS.
Add Maven dependencies
Add a dependency for the TRS Server library:
<dependency>
  <groupId>org.eclipse.lyo.trs</groupId>
  <artifactId>trs-server</artifactId>
    <version>${version.lyo}</version>
</dependency>
Set up the TRS JAX-RS Provider to your Application
The TRS Server library already contains a TrackedResourceSetService class that can handle the REST calls for TRS Base and ChangeLog. For this service to work, you will only need to provide a binding to a singleton of a class that implements the PagedTrs class.
Register the TRS JAX-RS Provider TrackedResourceSetService in your Application (the javax.ws.rs.core.Application subclass):
import org.eclipse.lyo.oslc4j.trs.server.service.TrackedResourceSetService;
...
public class Application extends javax.ws.rs.core.Application {
    private static final Set<Class<?>>         RESOURCE_CLASSES                          = new HashSet<Class<?>>();
    static
    {
      ...
      RESOURCE_CLASSES.add(TrackedResourceSetService.class);
      ...
    }
    ...
Provide the necessary binding definition for the PagedTrs class:
import java.util.Collections;
import org.eclipse.lyo.oslc4j.trs.server.PagedTrs;
import com.sample.adaptor.InmemPagedTrsSingleton;
import org.glassfish.hk2.utilities.binding.AbstractBinder;
...
public class Application extends javax.ws.rs.core.Application {
    ...
    @Override
    public Set<Object> getSingletons() {
        return Collections.singleton(new AbstractBinder() {
            @Override
            protected void configure() {
                bindFactory(new InmemPagedTrsSingleton()).to(PagedTrs.class);
            }
        });
    }
Define the InmemPagedTrsSingleton singleton class. Complete the code example below, with:
* the code that populates uris with the initial set of resources to be managed by InmemPagedTrs;
* the desired basePageLimit and changelogPageLimit parameters.
package com.sample.adaptor;

import java.net.URI;
import java.util.ArrayList;
import java.util.Iterator;

import javax.ws.rs.core.UriBuilder;
import org.eclipse.lyo.oslc4j.core.OSLC4JUtils;
import org.eclipse.lyo.oslc4j.trs.server.InmemPagedTrs;
import org.eclipse.lyo.oslc4j.trs.server.PagedTrs;
import org.eclipse.lyo.oslc4j.trs.server.service.TrackedResourceSetService;
import org.glassfish.hk2.api.Factory;
import org.slf4j.Logger;
import org.slf4j.LoggerFactory;

public class InmemPagedTrsSingleton implements Factory<PagedTrs> {
    private final static Logger log = LoggerFactory.getLogger(InmemPagedTrsSingleton.class);
    private static InmemPagedTrs inmemPagedTrs;

    @Override
    public InmemPagedTrs provide() {
        return getInmemPagedTrs();
    }

    @Override
    public void dispose(final PagedTrs instance) {
        log.debug("{} is getting disposed", instance);
    }

    public static InmemPagedTrs getInmemPagedTrs() {
        if(inmemPagedTrs == null) {
            log.debug("Initialising 'InmemPagedTrs' instance");

            ArrayList<URI> uris = new ArrayList<URI>();

            //TODO: populate uris with the initial set of resources to be managed by the InmemPagedTrs instance
            ....
            // not thread-safe
            inmemPagedTrs = new InmemPagedTrs(<basePageLimit>, <changelogPageLimit>,
                UriBuilder.fromUri(OSLC4JUtils.getServletURI()).path(TrackedResourceSetService.RESOURCE_PATH).build(),
                TrackedResourceSetService.BASE_PATH, TrackedResourceSetService.CHANGELOG_PATH, uris);
        }
        return inmemPagedTrs;
    }
}
The application is now ready to respond to REST requests from a TRS Client. Once running, the server will respond to requests on the relative path /trs.
Update the TRS data set
To update the set of OSLC resources that form the TRS Base and ChangeLog, call the following methods in the code:
InmemPagedTrsSingleton.getInmemPagedTrs().onCreated(aResource);InmemPagedTrsSingleton.getInmemPagedTrs().onModified(aResource);InmemPagedTrsSingleton.getInmemPagedTrs().onDeleted(aResource.getAbout());
Run the server
Once the server is developed, run it by selecting Run As ➞ Maven build ... from the project's context menu, and setting the goal to clean jetty:run-war.
Access the server from http://localhost:8080/adaptor-sample (adaptor-sample and 8080 will depend on the particular settings, as instructed above).
Pro Tip: If the error
Project configuration is not up-to-date with pom.xmloccurs, right click on the eclipse project and select Maven ➞ Update Project ...